
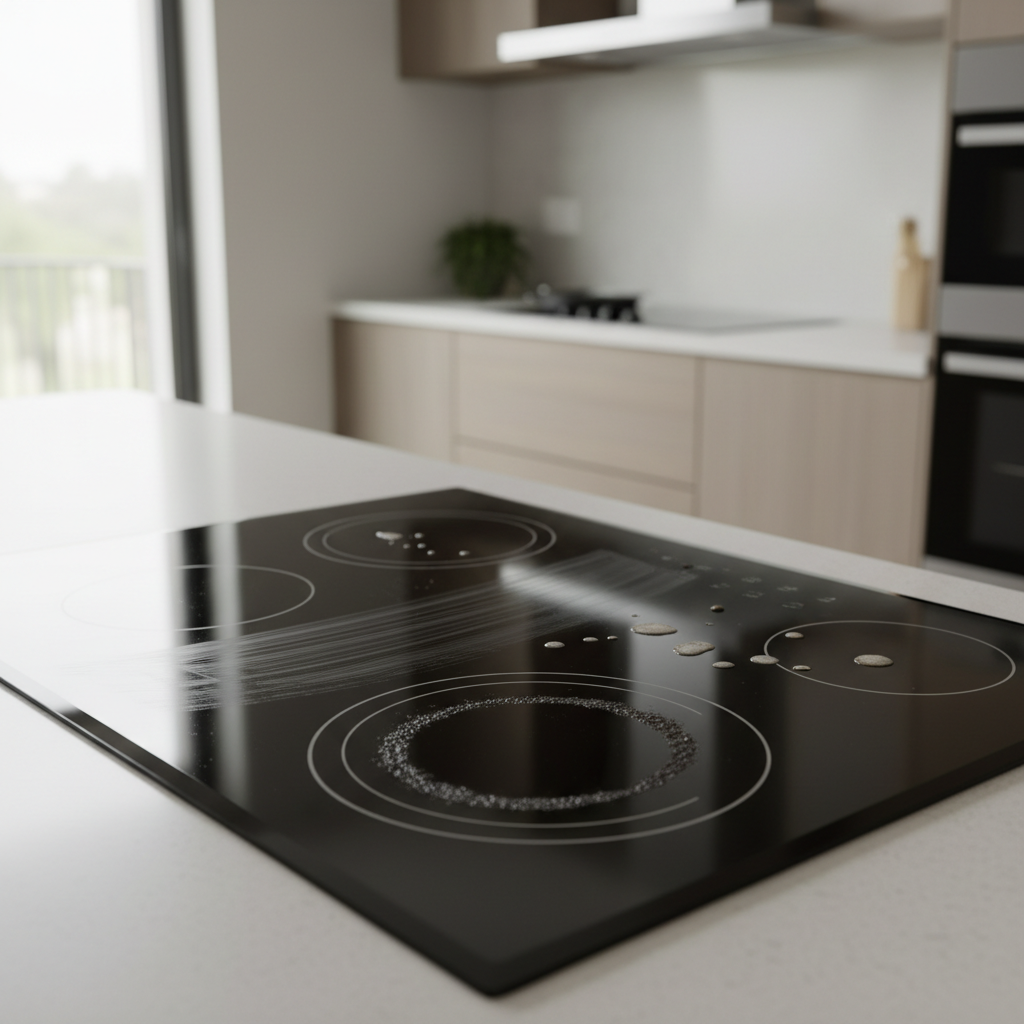
How to clean ceramic cooktops without scratches comes down to two things: using a non-abrasive tool and softening the mess before you scrub. If you’ve ever wiped a spill and ended up with dull streaks, micro-swirls, or a cloudy “haze,” you already know the frustration, the surface looks clean, but not nice.
This topic matters because ceramic and glass-ceramic cooktops are unforgiving. A little grit on a sponge, a powdered cleanser, or scraping at the wrong angle can leave marks that are hard to unsee. And when residue bakes on, many people panic-clean, which is when damage usually happens.
Below is a realistic, scratch-safe approach: what to use, what to avoid, and a simple routine you can repeat after weeknight cooking. I’ll also share quick “diagnostics” for the most common problems, like white marks, stuck sugar, and mystery dullness.
Why ceramic cooktops scratch (and why “more pressure” backfires)
Most scratches on ceramic cooktops are not dramatic gouges, they’re tiny abrasions that build up over time. The surface is tough, but it still loses the battle against grit and hard particles.
- Dry debris acts like sandpaper: salt crystals, crumbs, or burnt flakes dragged under a sponge leave micro-scratches.
- Abrasive products: powders, scouring creams, and “magic grit” cleaners can dull the shine even if they claim multi-surface use.
- The wrong pad: steel wool and many green scrub pads are too aggressive for glass-ceramic finishes.
- Burned-on sugar and plastics: these harden fast and tempt you to pry, which is where chipping or deep scratches can happen.
- Cookware bottoms: rough or dirty pan bottoms can grind residue into the surface, especially when you slide pans.
According to the U.S. Consumer Product Safety Commission (CPSC), you should follow the appliance manufacturer’s instructions for cleaning and maintenance to reduce risks and avoid damaging surfaces. That advice sounds generic, but it matters here because manufacturer-approved methods tend to be the least abrasive.
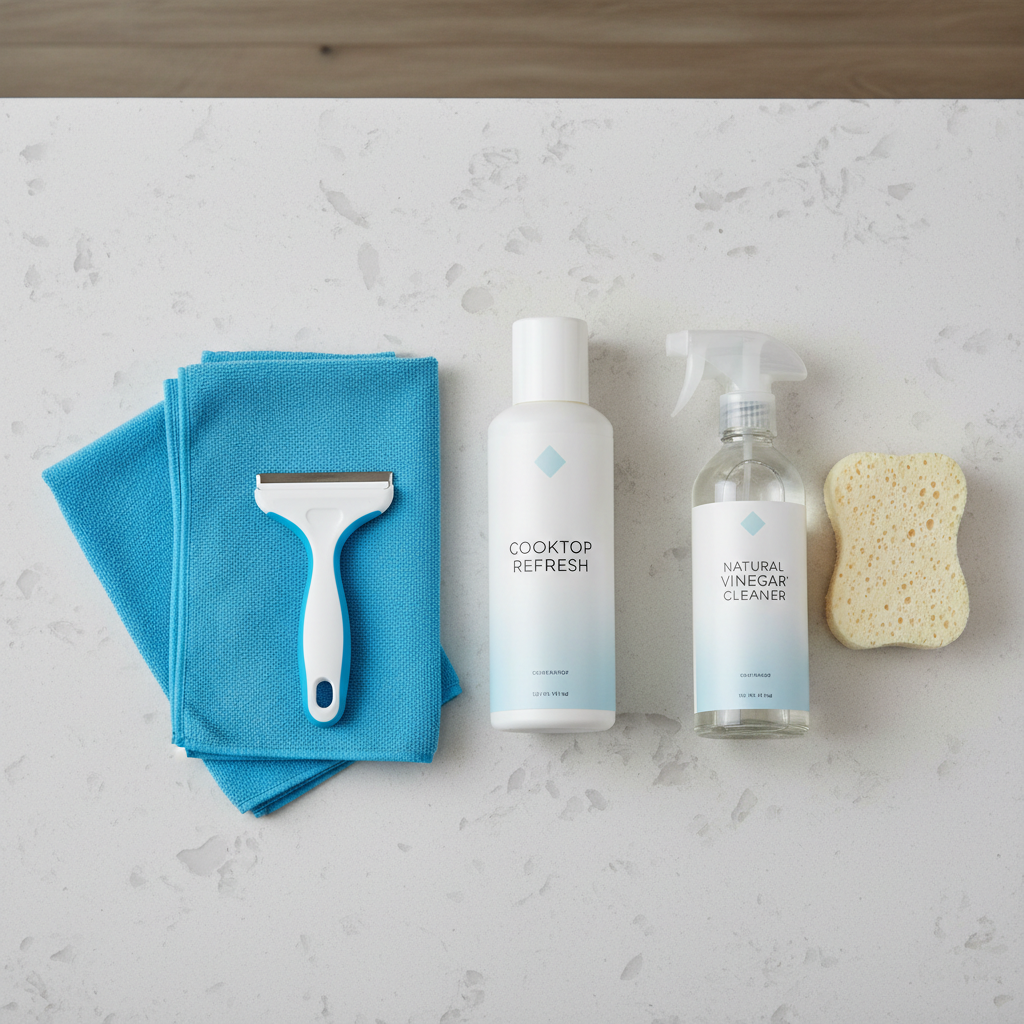
A scratch-safe toolkit (what to use, what to skip)
If you want consistent results, set up a small kit and stop improvising with whatever sponge is near the sink. The goal is to lift residue, not grind it.
Use these (usually safe for glass-ceramic)
- Microfiber cloths (a couple, clean and dry)
- Non-abrasive sponge labeled safe for nonstick or glass
- Ceramic cooktop cleaner (a cream or liquid designed for glass-ceramic)
- Plastic razor scraper / cooktop scraper with a fresh blade
- White vinegar in a spray bottle (for grease films and streaks)
- Warm water and a small bowl or towel for soaking
Skip these (common scratch culprits)
- Steel wool, metal scouring pads
- Most abrasive powders (including many “cleanser” cans)
- Knife blades, paint scrapers not meant for cooktops
- Highly alkaline oven cleaners unless your manufacturer explicitly allows it
One small habit that prevents scratches: keep a dedicated cooktop cloth and scraper in a drawer. When you use the “random sponge,” you’re also using whatever grit it picked up from the sink.
Quick self-check: what kind of mess are you dealing with?
Before you clean, identify the problem. Different residues respond to different tactics, and guessing is how people end up over-scrubbing.
- Light grease film + fingerprints: looks clean until the light hits it, usually needs a degrease and a dry buff.
- Burned-on rings: dark circles under burners, often needs cooktop cleaner + scraping at a shallow angle.
- White marks: can be mineral deposits, cleaner residue, or cookware transfer, vinegar often helps.
- Crusty bits: lifted food that can scratch if dragged, pick up with a damp wipe first.
- Melted sugar or plastic: treat as urgent once safe, can permanently pit the surface if left.
If you’re unsure whether you’re seeing residue or actual scratches, try this: clean the area gently, dry it completely, then check again under a phone flashlight. Residue changes, scratches don’t.
Step-by-step: daily cleaning that won’t dull the shine
This routine is what most people need 80% of the time. It also builds the right muscle memory, gentle first, scraping only when needed.
1) Let the surface cool (warm is fine, hot is not)
Cleaning a hot cooktop can flash-dry products into streaks, and it’s a burn risk. If your cooktop has a hot-surface indicator, wait until it’s off.
2) Remove loose grit before wiping
Use a dry microfiber to lift crumbs, or lightly sweep them off. This step is boring, but it’s one of the biggest scratch preventers.
3) Apply cooktop cleaner, then wipe with light pressure
Put a small amount of ceramic cooktop cleaner on the surface, spread it thin, then wipe in overlapping passes with a damp microfiber. Don’t chase perfection mid-wipe, you’ll buff later.
4) Rinse-wipe and dry-buff
Wipe once with a clean damp cloth to remove cleaner residue, then dry-buff with a separate microfiber until the surface looks even. If streaks remain, a light vinegar mist and another dry buff usually fixes it.
Key point: when people say they “can’t get rid of streaks,” it’s often leftover cleaner, not dirt. Less product plus a true rinse-wipe makes a big difference.
Tough stuff: burned-on stains, sugar spills, and “mystery haze”
This is where most scratches happen, not because the stain is impossible, but because the removal method is wrong for the residue.
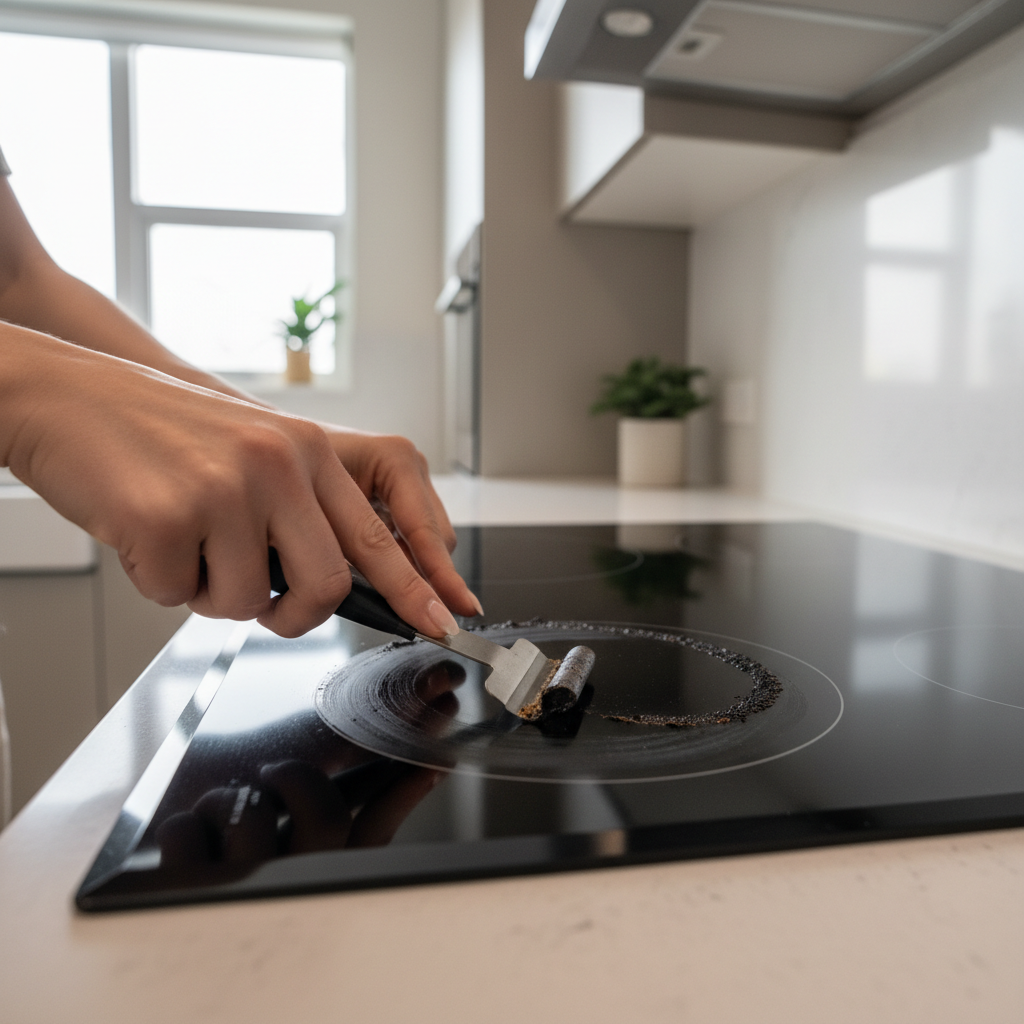
Burned-on food rings
- Apply cooktop cleaner and let it sit for a couple minutes so it softens the carbonized layer.
- Hold a cooktop scraper at a low angle, gently push under the residue, and work in short strokes.
- Wipe away loosened debris, then repeat once if needed rather than pressing harder.
Melted sugar, syrup, or plastic
These spills can damage glass-ceramic if they fuse into the surface. Many manufacturers recommend carefully scraping while the surface is still warm but not dangerously hot, using a proper cooktop scraper. If you’re not comfortable doing that safely, let it cool and consult your owner’s manual, in some cases calling a service pro is the smarter move.
Cloudy haze after cleaning
- Cleaner residue: rinse-wipe again, then dry-buff.
- Hard-water minerals: spray vinegar, wait 30–60 seconds, wipe and dry.
- Cookware transfer: use cooktop cleaner and a non-abrasive pad; avoid powders.
According to GE Appliances, glass/ceramic cooktops should be cleaned with products intended for that surface, and stubborn residues are often removed with a cooktop scraper used carefully. Different brands phrase it differently, but the method is widely consistent across major manufacturers.
What works best for each situation (quick reference table)
If you just want the “use this, not that” view, keep this table handy.
| Problem | What it looks like | What to use | What to avoid |
|---|---|---|---|
| Everyday grease film | Smears, fingerprints, light streaks | Cooktop cleaner + microfiber, finish with dry buff | Too much cleaner, air-drying |
| Burned-on rings | Dark circles near heating zones | Cooktop cleaner dwell time + cooktop scraper | Green scrub pads, scraping at steep angle |
| White cloudy marks | Haze after cleaning, hard-water spots | Vinegar mist + wipe + dry-buff | Abrasive powders that etch shine |
| Crumbs/grit | Little hard bits | Dry lift first, then damp wipe | Dragging grit with a wet sponge |
| Melted sugar/plastic | Hard glossy blob or smear | Cooktop scraper (follow manual), then cleaner | Prying with knife, waiting days |
Common mistakes that cause scratches (even when you “clean carefully”)
- Cleaning before removing crumbs: it feels faster, but it’s the classic micro-scratch setup.
- Using one cloth for everything: if it touched the counter or sink, assume grit exists.
- Overusing baking soda: it’s popular online, but it can act abrasive depending on how it’s used and the cooktop finish.
- Sliding cookware: lifting pans instead of sliding reduces wear, especially for cast iron or rough-bottomed pieces.
- Letting cleaner dry on the surface: dried product often turns into streaks that invite extra scrubbing.
If you want one rule to remember: soften, lift, wipe, buff. Skipping the “soften” part is where most people end up pushing grit around.
When it’s time to stop DIY and ask for help
Most stains come off with patience, but a few scenarios are worth escalating.
- Deep scratches you can feel: cleaning won’t remove them, you may want to ask the manufacturer about surface repair options.
- Chips, cracks, or spidering lines: stop using the cooktop and consult a qualified appliance technician, continued use can be unsafe.
- Burned sugar that seems fused: check your owner’s manual for brand-specific guidance, if you’re unsure, a service call may prevent worse damage.
- Electrical issues (burning smell, burner cycling oddly): cleaning is not the fix, get professional inspection.
For safety concerns, especially cracks or electrical symptoms, it’s reasonable to consult a professional technician. If you have health sensitivities to cleaners, choosing fragrance-free products and ensuring ventilation can help, and you can ask a clinician for advice if you’re uncertain.
Key takeaways (so you don’t overthink the next cleanup)
- How to clean ceramic cooktops without scratches starts with removing grit before any wet wiping.
- Use a dedicated microfiber and a cooktop cleaner designed for glass-ceramic surfaces.
- For burned-on residue, dwell time plus a proper scraper beats heavy pressure.
- Streaks usually mean residue, rinse-wipe and dry-buff instead of scrubbing harder.
If you pick one action today, make it this: put a cooktop scraper and two clean microfiber cloths where you’ll actually use them, that alone prevents a lot of “panic scrubbing.”
FAQ
How often should I clean a ceramic cooktop?
Light wiping after each cooking session prevents buildup, and a more thorough clean once a week is enough for many households. If you cook with sugary sauces or high heat often, you may need a deeper clean more frequently.
Can I use vinegar as my main cleaner for ceramic cooktops?
Vinegar works well for mineral deposits and light grease films, but it’s not always strong enough for burned-on carbon. Many people use vinegar as a finishing step to reduce streaks, then rely on a cooktop cleaner for heavy residue.
Is baking soda safe on glass-ceramic cooktops?
It can be, but it’s easy to overdo. As a paste, it may still act abrasive depending on pressure and how fully it dissolves, so if you’re trying to avoid scratches, a purpose-made ceramic cooktop cleaner is usually the safer bet.
What’s the safest way to scrape burned-on food off without scratching?
Use a cooktop scraper with a fresh blade, hold it at a shallow angle, and push gently after softening the residue with cooktop cleaner. If you feel like you need force, pause and re-soften instead of pressing down harder.
Why does my cooktop look cloudy even after I clean it?
Cloudiness is often leftover cleaner film or hard-water minerals. Try a damp rinse-wipe followed by a dry buff, and if the haze persists, a light vinegar mist can help. If it still doesn’t change, it may be wear or micro-scratching rather than residue.
Can scratched ceramic cooktops be repaired?
Minor marks sometimes look better after a thorough clean and polish with a cooktop product, but true scratches typically won’t disappear. If the scratch is deep or you see any cracking, checking with the manufacturer or a technician is more realistic than trying to “buff it out.”
How do I prevent scratches from pans?
Keep pan bottoms clean and dry, avoid sliding cookware, and be cautious with cast iron or rough-bottomed pieces. Also, wiping away grit before cooking helps because heat can bake tiny particles into a harder layer.
If you’re cleaning often and still fighting rings or haze, you might prefer a simpler setup: one cooktop-safe cleaner you trust, a dedicated microfiber pair, and a scraper you use calmly instead of as a last resort. That combination tends to keep the surface glossy with less effort and fewer “oops” moments.