
diy hanging fruit hammock for kitchen cabinet projects solve a very specific kitchen annoyance: fruit that crowds the counter, ripens too fast in a pile, or gets bruised when it rolls around in a bowl.
The nice part is you don’t need fancy tools or “craft room” vibes to make one, you just need a bit of mesh or fabric, two mounting points, and a plan for where the weight will hang. Done well, this keeps bananas, citrus, onions, even garlic off the counter while still staying visible, which helps reduce waste.
If you’ve tried a fruit bowl already and it still turns into a messy stack, a hammock changes the geometry. Fruit spreads into a single layer, airflow improves, and you regain a chunk of usable workspace without committing to a permanent shelf.
One quick expectation check: this is great for sturdy produce, but it’s not the place for soft berries or anything that needs refrigeration. I’ll call out those boundaries as we go, so you don’t build something cute that you stop using a week later.
Why a cabinet fruit hammock works better than a bowl (most of the time)
A bowl looks tidy until it isn’t. In real kitchens, it becomes a pile, and piles create pressure points that speed up bruising. A hammock, when sized right, keeps items from pressing into each other.
- More airflow: helps slow moisture buildup and surface mold on items like citrus and onions in many households.
- Single-layer storage: less “bottom fruit” that gets forgotten.
- Uses dead space: the underside of upper cabinets often does nothing.
- Visibility: you see what you have, which reduces the “oh no, those oranges” moment.
According to USDA Food Safety and Inspection Service, storage guidance varies by item, and some produce should be refrigerated while others do better at room temperature. A hammock is a room-temp solution, not a universal storage upgrade.
Quick self-check: is your cabinet a good candidate?
Before you cut fabric, take 2 minutes and decide if this makes sense for your space. The most common failure is installing it where cabinet doors hit it, or where the fruit ends up over a heat source.
- Clearance: at least 10–14 inches of vertical space under the cabinet, more if you want bananas to hang without touching the counter.
- Door swing: cabinet doors should open fully without rubbing the hammock or hardware.
- Heat/steam: avoid areas directly over a toaster oven, kettle, or near a stove where heat and grease can be issues.
- Mounting surface: solid wood cabinet bottom is easiest. Thin fiberboard can work, but needs the right anchors.
- Traffic: don’t place it where heads or shoulders constantly bump it, you’ll resent it.
If you’re renting, plan for a removable setup, like adhesive hooks rated for the real load, or a tension-rod approach inside a cabinet opening.
Materials and tool options (and what I’d pick)
You can build a diy hanging fruit hammock for kitchen cabinet setups with different “feel,” from rustic macramé to minimalist mesh. The best material is the one you’ll actually keep clean.
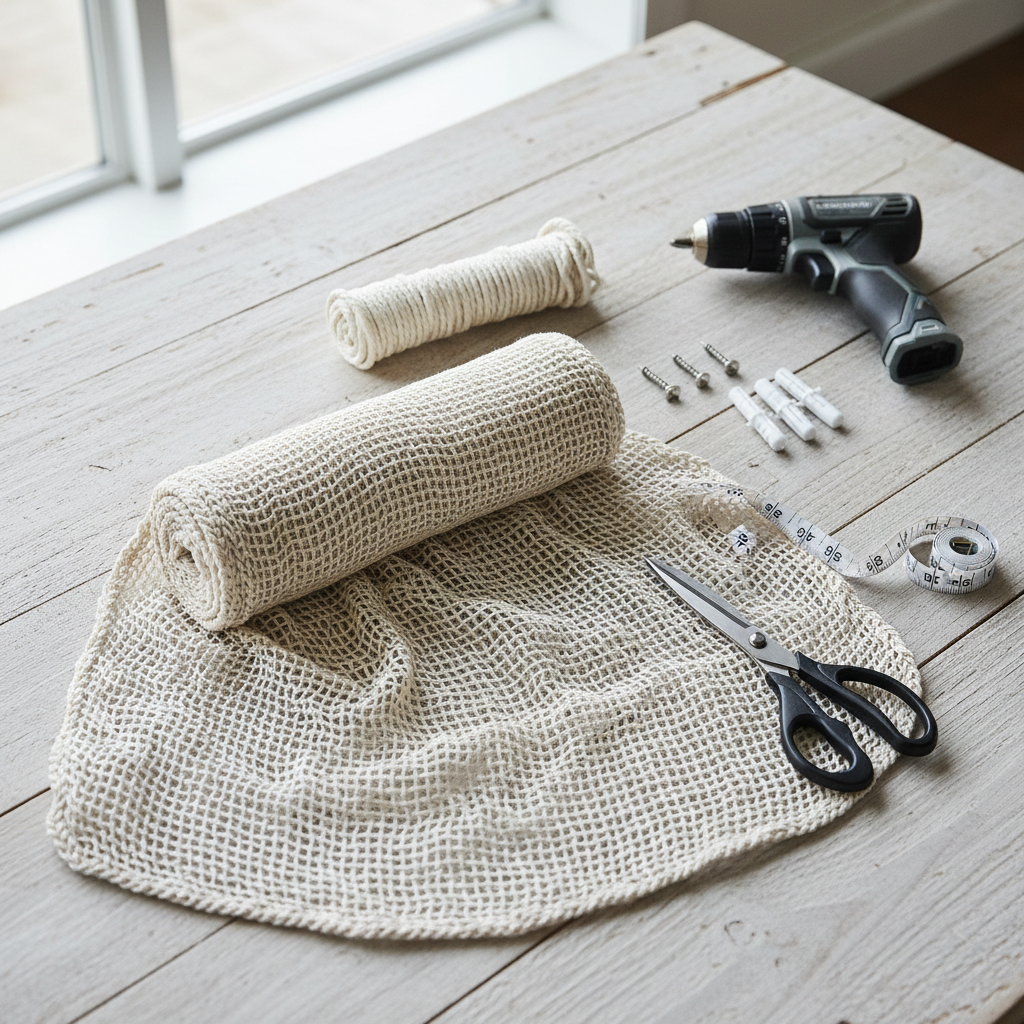
Common hammock “bodies”
- Produce mesh bag fabric: breathable, easy to shake out crumbs, looks casual.
- Cotton net or macramé cord: prettier, but can collect dust and needs a bit more upkeep.
- Canvas with grommets: sturdy and cleanable, but less airflow unless you add vents.
Hardware choices
- Screw-in cup hooks: simple, cheap, reliable on solid wood.
- Small eye screws + carabiners: makes removal for washing easier.
- Adhesive hooks: renter-friendly, but only if your cabinet surface and the hook rating match the load.
Tools
- Measuring tape
- Scissors
- Drill or screwdriver (depending on hardware)
- Stud finder not needed for cabinets, but a small awl helps start pilot holes
Build it: a simple under-cabinet fruit hammock in 6 steps
This version aims for “clean and functional,” not a weekend craft marathon. If you can measure and tie a knot, you’re good.
Step 1: Pick the span and sag
Measure the underside width where you want the hammock. Most people like 14–24 inches. Decide how deep you want the sag; too deep turns into a pouch where fruit stacks again. A gentle curve usually works.
Step 2: Cut your mesh/fabric
Cut a rectangle about 1.5x the span width and about 10–14 inches deep. If you’re using stretchy mesh, cut a little smaller than you think, it relaxes under weight.
Step 3: Reinforce the corners
Corners are where DIY hammocks fail. Fold each corner over twice and stitch, or use grommets. If sewing is not your thing, a tight wrap with strong cord around the corner fold can work, but check it often.
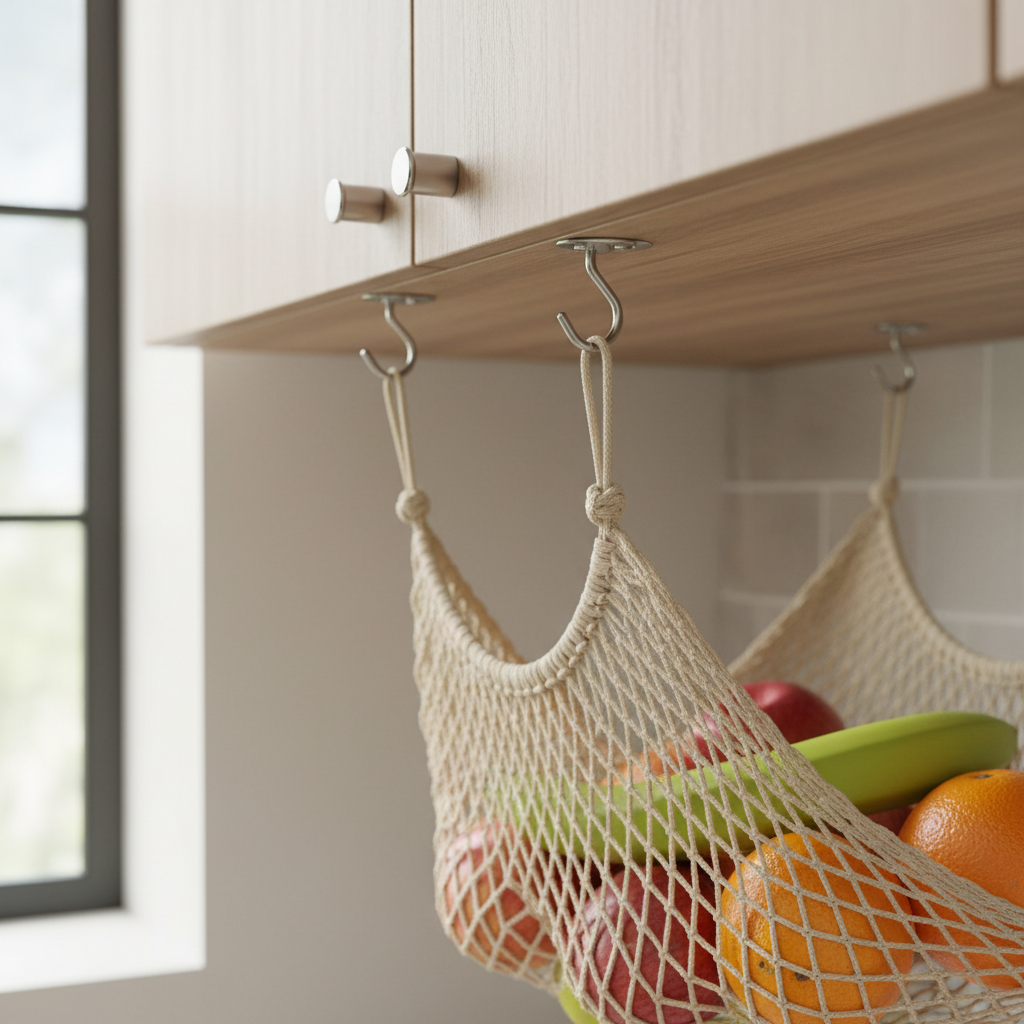
Step 4: Add hanging points
Thread cord through the reinforced corners and tie secure knots. You want four cords that meet into two connection points (left and right). That spreads weight and keeps the hammock from twisting.
Step 5: Install hardware under the cabinet
Mark two points under the cabinet, usually 2–3 inches in from each end of the span. Pre-drill a small pilot hole if using screw hooks, then twist the hook in by hand. If your cabinet bottom seems thin, use appropriate anchors, or move the mount closer to a supporting frame rail.
Step 6: Hang, load lightly, then adjust
Hang the hammock and start with a few pieces of fruit. Adjust knot length so the hammock sits high enough to avoid counter contact, but low enough that fruit stays accessible. Then increase the load gradually.
What to store in it (and what to keep out)
A hammock feels like it should hold “all produce,” but real-world use is pickier. Think sturdy skins and room-temp comfort.
| Great fit | Okay with caution | Skip for most kitchens |
|---|---|---|
| Bananas, oranges, lemons, limes | Apples and pears (watch ripening) | Berries, cut fruit, leafy greens |
| Onions, garlic (if dry area) | Avocados (separate from bananas) | Tomatoes if your kitchen runs hot |
| Small squash (lightweight) | Kiwis, peaches (bruise risk) | Potatoes near onions (quality issues) |
Key point: bananas and avocados can speed up ripening of nearby produce because they release ethylene gas. That’s not “bad,” it’s just something to use intentionally so you don’t accidentally fast-forward everything.
Common mistakes that make people stop using it
Most “this didn’t work” stories come down to placement or load management, not the concept itself.
- Hanging it too low: fruit touches the counter, the hammock becomes annoying instead of helpful.
- Overloading: a hammock is not a pantry basket, keep it light so airflow and access stay good.
- Using rough rope near food prep: fibers can shed, and cleaning gets old fast.
- Mounting into weak material: if you feel the hook “wobble,” stop and re-mount into stronger wood or use proper anchors.
- Putting it near heat: warm air can speed ripening, sometimes dramatically.
If you’re unsure about cabinet construction or safe mounting, it’s reasonable to ask a handyman or contractor, especially if you plan to store heavier items.
Practical upgrades: make it easier to live with
Once the basic diy hanging fruit hammock for kitchen cabinet build works, small upgrades keep it from turning into another fussy DIY object.
- Add carabiners: clip-on removal makes washing simple, no re-tying knots every time.
- Go two-tier (carefully): two shallow hammocks often work better than one deep one, but keep total weight low.
- Use washable materials: machine-washable mesh or a removable liner saves you from spot-cleaning.
- Label a “ripen zone”: keep bananas in one corner, put slower items on the other side.
Key takeaways before you start
- Plan placement first, then build to fit the cabinet span and clearance.
- Reinforce corners, because that’s where wear shows up early.
- Keep the load light, the goal is airflow and accessibility, not bulk storage.
- Store the right items, sturdy room-temp produce wins, fragile or refrigerated items lose.
Conclusion
A fruit hammock under a cabinet is one of those small kitchen changes that can feel surprisingly “big” once you live with it, less counter clutter, fewer bruised pieces, and a setup that nudges you to eat what you already bought.
If you want a good first attempt, keep it simple: breathable mesh, two solid hooks, and a shallow sag. Build it, test it for a week, then decide if you want the prettier version with nicer cord and removable clips.
FAQ
- How much weight can an under-cabinet fruit hammock hold?
It depends on your cabinet material and hardware. Many setups do fine with a few pounds of fruit, but if you’re not confident the cabinet bottom is solid wood, keep the load conservative and consider stronger anchors or a professional opinion. - Will a hanging hammock keep fruit fresh longer?
Often it helps by reducing bruising and improving airflow, but it won’t override the natural ripening cycle. Also, ethylene-producing fruit can still speed ripening of nearby items. - What’s the easiest no-sew method?
Using a sturdy produce mesh bag and tying reinforced corner bundles with strong cord is the quickest. Just check the knots periodically since friction and weight can loosen them over time. - Can I use Command hooks or adhesive hooks inside a cabinet?
Sometimes, but you need to match the hook rating to the real load and ensure the surface is clean and compatible. Humidity, grease, and textured finishes can reduce adhesion, so test cautiously. - Where should I avoid installing it?
Avoid areas over high heat or heavy steam, and avoid spots where cabinet doors or appliances will hit the hammock. If you have a gas range below, extra caution makes sense. - How do I clean a fruit hammock?
Removable clips help a lot. Many mesh fabrics can be hand-washed with mild soap and air-dried. If you notice odors or sticky spots from overripe fruit, wash sooner rather than later. - Can I store onions and potatoes together in the same hammock?
Many people try it, but quality can suffer when they’re stored close together for extended periods. If you want both out of the way, separate them into different spots.
If you’re already eyeing your cabinet space and thinking “I want this, but I’d rather not guess the hardware,” consider using a small pre-made hanging kit with removable clips and washable mesh, then tweak the sizing to your cabinet so you still get the DIY fit without the trial-and-error.